Ragnarok Online Server Guide – Make own Ragnarok Online/Offline Server Guide 2
Preparing Ragnarok ClientSide
After we are done with first step, here we go.
Choose the client version
For rAthena revision (is 17102 when I make this post), I’d like to use client version that made on 2012-04-10, it’s 2012-04-10aRagexeRE, it can be downloaded here.
The client date means the client version, and it will be used for initializing on server mmo.h file.
Patch the client exe (2012-04-10aRagexeRE.exe) using WeeDiffGenerator plugin on ShinsDiffPatcher
The fresh client exe can’t be used, also we can decide some option on client exe when patching. ShinsDiffPatcher can be downloaded here, badly you must download everything there manually or can use TortoiseSVN.
Then, how to patch it? Just follow these simple steps below.
- Open the ShinsDiffPatcher.

Patch Ragnarok Client – ShinsDiffPatcher is used to patch client exe - Select the “Source executable:” from folder that you placed “2012-04-10aRagexeRE.exe“, open it!
- On ShinsDiffPatcher window, select the “Select patch engine” use “WeeDiffGenerator v1.0.2“. Click “Yes” and it will gives you recommended patchs.

Patch Ragnarok Client – Choose the source file and the engine - Maybe there are something that you want to change, change them. Whatever you can change, but better I give you recomendation to DON’T CHECK “HKLM to HKCU” for this client version, or it will makes your Setup file keep ‘popping’ up eternally.

Patch Ragnarok Client – You can change some if you want - Then click on “Patch it!”.

Patch Ragnarok Client – The client exe is patched - On 2012-04-10aRagexeRE folder you will get new file, the patched exe, move it to your client folder (hope you use latest version of kRO).
- Also, make a new file, clientinfo.xml for your new client exe, you can download the sample here. Latest rAthena revision support packet_db_ver 30, so change the <version> to 30.

Sample of clientinfo.xml
Preparing ClientSide for YourRO (Lua Files – Lub Files – Translation Project)
After we’re done with client exe, we need some files for it. Just follow these steps. 😀
Lub Files for 2012-04-10aRagexeRE.exe – Translated Lua and Lubs files
These files are translated file data if you want to your RO in English version.
- Download translated Lubs+src (Lua files) from this link https://subversion.assembla.com/svn/ClientSide/Lua_Project/lubs/2012-04-10%20Lub+src%20Files%20%5bTranslated%5d.rar
- Extract them.
- Select all files and folder on 2012-04-18 Lub+src Files [Translated]\data\luafiles514\lua files\.
- Paste them onto ROClientFolder\data\luafiles514\lua files\.
Translation Project – Translation Skin – Translation Client for 2012-04-10aRagexeRE.exe
These files are translated skin if you want your RO skin and datas in English version.
- Download Lua Files for your client using TortoiseSVN, make new folder, e.g “client-data” then right-click it > SVN Checkout > Insert this link https://subversion.assembla.com/svn/ClientSide/Translation_Project then on Revision, insert 203.
- Click OK, wait until it’s done.
- Select all items inside “client-data\data” folder, copy them.
- Paste on your ROClientFolder\data.
Item Client Datas – New Client RagexeRE version will reads data info from System\ItemInfo.lub
- Download System lub files (better using your TortoiseSVN – hate to download manually), make a new folder, “client-system” then right-click > SVN Checkout > Insert this link http://svn6.assembla.com/svn/ClientSide/Lua_Project/System/ then on Revision, insert 203.
- Click OK, wait until all files downloaded.
- Copy ItemInfo.lub then paste it on your ROClientFolder\System\
- Every change about item datas, you need to edit there.
**NOTE: Newer client RagexeRE is not on idnum2itemresnametable.txt, idnum2itemdesctable.txt, idnum2itemdisplaynametable.txt, num2itemresnametable.txt, num2itemdesctable.txt, num2itemdisplaynametable.txt, and itemslotcounttable.txt anymore!
**How I can edit it? Just open it with Notepad++
**Why I can’t read ItemInfo.lub contents? Lub file is compiled from lua.file, so you can edit your ItemInfo.lua and save it as ItemInfo.lub
2012-04-10aRagexeRE.exe Setup Issues – Resolution can’t be changed? – Always shows error SaveData\OptionInfo
- Download Lua Files for your client using TortoiseSVN, make new folder, e.g “client-system” then right-click it > SVN Checkout > Insert this link http://svn6.assembla.com/svn/ClientSide/Lua_Project/System/ then on Revision, insert 203.
- Click OK, wait until it’s done.
- Select all items inside “client-system” except “.svn” folder, copy them.
- Paste on your ROClientFolder\System.
- I use Blue Ghost Setup for my client setup, why don’t try it too? Set it up! (I got it from here http://rathena.org/board/topic/58984-new-setup-english/)
- Your client side is ready for your server. 😀
**NOTE: This way also fix resolution problem, that doesn’t change even you try hundred times to change it using any setup.exe version**
**NOTE: If you got this problem, SaveData\OptionInfo [string “buf”]:1: attempt to index global ‘CmdOnOffList’ (a nil value), do these steps above.**
Setup.exe issue – How is setup file always popping up?
Because you patch your client.exe (RagexeRE) using HKLM to HKCU, client exe will reads your registry about the setup configuration, that why at the step above I didn’t ask you to check the HKLM to HKCU. Setup resolution issue that maybe doesn’t change after your setup your setup.exe, it’s solved on 2012-04-10aRagexeRE.exe Setup Issues – Resolution can’t be changed? – Always shows error SaveData\OptionInfo
Compiling The Server – Compile the server using Microsoft Visual Studio 2010
Compiling the server for the first time has purpose to match the server version with client version (in this guide I use 2012-04-10aRagexeRE). So, just follow these steps below.
- Open the rAthena-10.sln (as subtitle said, using Microsoft Visual Studio 2010).

Compile Ragnarok Server – Open rAthena-10.sln to start - Wait until it ready, then open mmo.h file. You can find it on Solution Explorer (right-side bar) inside map-server_sql > common.
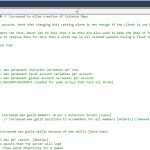
- Change #define PACKETVER value becomes 20120410 if it’s 20120410 (because our client version is 2012-04-10aRagexeRE).

Compile Ragnarok Server – Change the PACKETVER if it’s needed - Maybe you can change some basic server configurations here, but be carefull, they have limits. Maybe like MAX_INVENTORY every char, MAX_CHARS each account, MAX_AMOUNT of stackable item, MAX_CART inventory, MAX_STORAGE each account, and MAX_GUILD_STORAGE for every guild.
Compile Ragnarok Server – Change some configuration if needed - Then, on solution project, right-click > Clean Solution.

Compile Ragnarok Server – Clean Solution - After it’s done, right-click again on solution project, choose Rebuild Solution.

Compile Ragnarok Server – Rebuild the Solution - Wait until Rebuild All succeeded and make sure for 0 failed also 0 skipped.
Compile Ragnarok Server – Rebuild is complete - Compiling will renew mapcache.exe, map-server_sql.exe, char-server_sql.exe, and login-server_sql.exe.
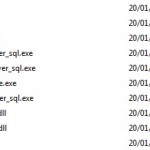
Compile Ragnarok Server – New files after compiling
Client .exe is ready now, and the server is matching now with the client .exe. We are ready for change the basic connection now. 😀
Download Section
- Download 2012-04-10aRagexeRE.exe patched client
- Download 2012-04-18aRagexeRE.exe patched client
- Download Lub files for 2012-04-10aRagexeRE
- Download Lub files for 2012-04-18aRagexeRE
- Download Translated_Project interface for 2012-04-10aRagexeRE
- Download Translated_Project interface for 2012-04-18aRagexeRE
- Download System Lub-Lua files for 2012-04-10aRagexeRE
- Download System Lub-Lua files for 2012-04-18aRagexeRE
**Extract using 7zip**
Ragnarok Online Server Guide – Make own Ragnarok Online/Offline Server Guide 3: Change the basic connection guide. (How to connect to the database?)
We will talk about MySQL database and how to connect it to ragnarok server. 😀
strong
the links are dead, can anyone update this? pleaseeee
TortoiseSNV asks username and passord for ShinsDiffPatcher…
What is ?
thank you!
Sorry, I don’t have time to take care this post. For client diff/patcher, try use NEMO, imho, NEMO is better than other patchers nowadays.
https://github.com/MStr3am/NEMO
been folowing your guide and am stuck at the rebuild step keep getting this error. help would be great
Error 1 error LNK1123: failure during conversion to COFF: file invalid or corrupt C:\Users\Me\Desktop\rathena\trunk\vcproj-10\LINK mapcache
Error 2 error LNK1123: failure during conversion to COFF: file invalid or corrupt C:\Users\Me\Desktop\rathena\trunk\vcproj-10\LINK login-server_sql
Error 3 error LNK1123: failure during conversion to COFF: file invalid or corrupt C:\Users\Me\Desktop\rathena\trunk\vcproj-10\LINK map-server_sql
Error 4 error LNK1123: failure during conversion to COFF: file invalid or corrupt C:\Users\Me\Desktop\rathena\trunk\vcproj-10\LINK char-server_sql
Which client would I download for an eAthena revision? I’m trying to setup a pre-renewal server.
I prefer Ultimate. 😀
Microsoft Visual Studio 2010? professional or ultimate?